The short answer
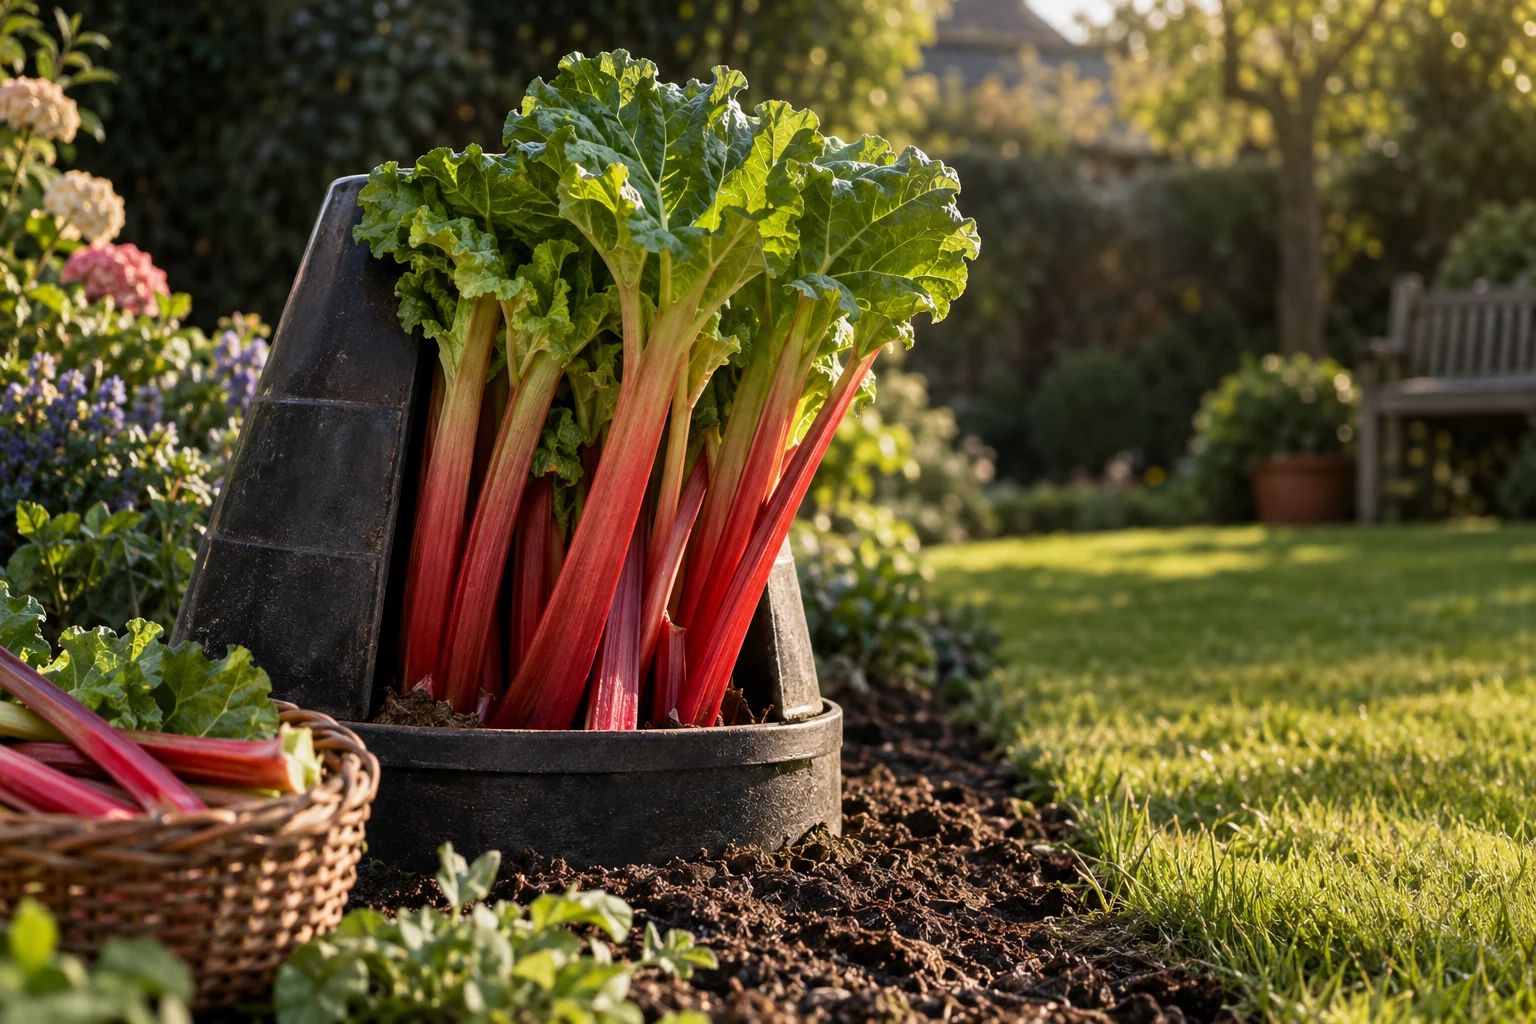
Force an established crown at least three years established that wasn't forced last winter. Once it has had a good winter chill, mulch around it, then cover it with a completely lightproof bucket or forcer in December or January. Pull the pale stems at 20–30cm, about six to eight weeks later, then rest the crown for a full year.
When to do it
Now: November is a good time to plant rhubarb crowns and divide old clumps.

Useful for preparing the planting site and lifting an established rhubarb crown when dividing or replanting it. Having both tools makes it easier to loosen the soil without relying on a single digging tool.
Check price on Amazon
Useful for cutting away dead foliage and unwanted flower stalks during the annual care routine. Clean, controlled cuts help keep the crown tidy without damaging nearby growth.
Check price on AmazonWe link to the exact model on Amazon UK. Prices change often, so check the live price before you buy. As an Amazon Associate we earn from qualifying purchases.
Rhubarb is the plant equivalent of that reliable friend who turns up to help you move house without being asked. It sulks a little in the first year, then simply gets on with it for a decade or more, sending up armfuls of stems every spring with barely a word of encouragement. Most allotments have a clump in the corner that nobody remembers planting. Some of those clumps are older than the plot holders.
And yet the most satisfying thing you can do with rhubarb isn't simply growing it. It's forcing it — persuading a crown to produce long, slender, glowing pink stalks in the dead end of winter, when fresh home-grown fruit of any kind feels like a minor miracle. It's not difficult. It doesn't need special kit. It does need a little planning, and mid-November happens to be precisely the right moment to start that planning.
So this is the full story: picking a crown, planting it properly, keeping it vigorous, dividing old clumps, and then the forcing itself — what goes over the top, when, for how long, and what to do once those first stems appear.
What Is Rhubarb Forcing and Why Every UK Gardener Should Try It
Forcing is, at heart, a deliberate act of deprivation. You take a dormant rhubarb crown, cover it so that no light whatsoever reaches it, and let it wake up in the dark. The plant, sensing that spring has arrived but finding no sunshine, does what any sensible plant would do: it stretches upwards in search of light, drawing on the energy stored in its fleshy roots. The result is a crop of long, smooth, pale stems topped with small, crumpled, yellowish leaves — ready several weeks ahead of uncovered plants, typically somewhere in the region of four to six weeks earlier than the outdoor crop.
It looks faintly unnatural the first time you lift the lid. Those leaves are the colour of old parchment. The stalks, meanwhile, range from shell pink to a deep rosy crimson, and they're tender enough to snap like celery.
A very Yorkshire tradition
If forcing has a spiritual home, it's West Yorkshire. The so-called Rhubarb Triangle historically spread across the countryside between Wakefield, Leeds and Bradford, and today centres on a smaller patch around Wakefield, Morley and Rothwell. Growers there have been forcing rhubarb commercially since the 1800s, and the area's cold winters, heavy soils and once-plentiful supplies of coal and manure suited the job perfectly.
The commercial method is wonderfully theatrical. Crowns are grown outdoors in fields for a couple of years, exposed to winter cold, then lifted and moved into long, low, pitch-black forcing sheds. Picking is famously done by candlelight so as not to disturb the growth, and the first forced stalks reach the shops from around January onwards. Growers will tell you that in the quiet of a forcing shed you can actually hear the rhubarb growing — a soft creaking and popping as buds unfurl. I've never been brave enough to doubt them.
You don't need a shed, candles or a field. A bucket and a bit of patience will do.
Why forced stems taste different
The technical term for what's going on is etiolation: growth in the absence of light. Without light, the plant can't produce chlorophyll, which is why the leaves stay yellow and the stems lose any hint of green. Instead, the colour comes through as those clean pinks and reds. The stems also grow quickly and stay thin-skinned, so they need little or no stringing before cooking.
Flavour-wise, forced rhubarb is noticeably gentler. It's widely described as sweeter and less sharp than outdoor stems, with forcing commonly credited with lowering the oxalic acid that gives rhubarb its eye-watering tang whilst the sugars come through more clearly. In practical terms, you'll need less sugar in the crumble, and the stalks collapse into silky pink ribbons rather than stringy khaki ones.
Why bother, honestly?
Because in late winter, there's almost nothing else to pick. Forced rhubarb fills the "hungry gap" before it's even officially started, and a single good crown under a bucket can produce enough stems for a couple of crumbles and a jar of compote. For the cost of an old bin and a bit of manure, that's a pretty handsome return.
One rule above all: forcing takes a heavy toll on a crown. Never force the same plant two years in a row. If you want forced rhubarb every winter, you need at least two established crowns and you take turns between them. That's why dividing clumps — covered further down — matters so much to anyone who gets hooked.
Choosing Your Crown: Varieties Rated for Forcing Success
All rhubarb can technically be forced. Not all rhubarb forces well. The variety you choose influences how early the stems come, how tender they are and how much colour they carry, so if forcing is the main aim, it's worth being picky.
Early, mid and late — why it matters
Rhubarb varieties broadly fall into early, mid-season and late types. Early varieties break dormancy sooner after winter cold, which makes them natural candidates for forcing — they respond quickly once covered and give you stems at the earliest possible date. Mid-season and late varieties can still be forced, but they tend to start later and the results are often a touch less refined. Late varieties really shine as outdoor plants, extending your picking season into early summer after the early types have been rested.
A sensible plan, if you have room, is one or two early varieties for forcing and a mid or late variety for bulk outdoor cropping. That way, the forced crown can rest whilst the other keeps the kitchen supplied.
The varieties worth growing
'Timperley Early' is the one I'd put at the top of almost anyone's list. It's an RHS Award of Garden Merit holder and is the most widely recommended variety for forcing in home gardens. Under a forcer, it will typically produce stems in January and February — exactly when you want them. It's reliable, it isn't fussy and it takes the stress of forcing well, provided you rest it afterwards.
'Stockbridge Arrow' is a commercial favourite in the Rhubarb Triangle, which tells you most of what you need to know. It's very early, with long, well-coloured stems that look exactly like the forced rhubarb you see in greengrocers in late winter. If you want to recreate the Yorkshire look at home, this is your plant.
'Champagne' is an early variety with beautifully pale pink stems and excellent sweetness when forced. It's a lovely choice if you care about delicacy of flavour more than sheer bulk.
'Victoria' is the old faithful — a mid-season variety you'll find on countless allotments. It's dependable and productive, but it wakes up later and the forced stems are generally less tender and less vividly coloured than those of the early specialists. I'd grow it for the outdoor harvest rather than for forcing, but if it's what you've inherited, it will still give you something worth eating.
| Variety | Season | Forcing suitability | Stem character | Best role |
|---|---|---|---|---|
| 'Timperley Early' | Early | Excellent — ready Jan–Feb when forced | Tender, well coloured | First-choice forcer; RHS AGM |
| 'Stockbridge Arrow' | Very early | Excellent — Rhubarb Triangle favourite | Long, classic forced look | Forcing for show and flavour |
| 'Champagne' | Early | Very good | Pale pink, notably sweet | Forcing for delicate flavour |
| 'Victoria' | Mid-season | Fair — less tender when forced | Reliable, productive | Main outdoor crop |
Crowns versus seed: no contest
You can grow rhubarb from seed, and it's cheap, but it's slow and unpredictable. Seed-raised plants vary from their parent and you're looking at a minimum of three to four years before there's a meaningful harvest. Crowns — sold bare-root in the dormant season or potted up for planting most of the year — give you a named variety, true to type, with a first light picking in year two and a proper crop in year three.
For forcing specifically, crowns are the only sensible route. You want a known early variety, and you want it established as quickly as possible so it's strong enough to be forced. Mid-November is an ideal time to buy: bare-root crowns are dormant, readily available and settle in quickly in soil that's still holding a little warmth.
Soil, Site, and Planting: Getting the Foundations Right
Rhubarb is a long-term resident. A well-planted crown can crop for ten years or more in the same spot, so the twenty minutes you spend preparing the ground now will be repaid many times over. Cut corners and you'll spend years wondering why your neighbour's rhubarb is the size of a small car and yours looks apologetic.
What the soil needs
Rhubarb wants deep, fertile, free-draining soil. It's a hungry plant with big, fleshy roots that go down a long way, and it rewards rich ground generously. A pH of 6.0–6.8 — slightly acidic to neutral — suits it well, which covers most garden soils in the UK.
The one thing it really won't tolerate is sitting wet. Waterlogged roots in winter lead to crown rot, where the centre of the plant turns soft, brown and evil-smelling, and the whole thing can collapse. If you garden on heavy clay, work in plenty of organic matter and consider planting on a slight mound or in a raised bed so excess water can drain away from the crown.
Choosing the spot
Full sun is ideal, though rhubarb copes perfectly well with partial shade — it's one of the more forgiving edibles for a spot that only gets sun for half the day. Give it room: a mature plant can spread its leaves well over a metre, so don't squeeze it in beside anything you value.
Avoid frost pockets — those low-lying corners where cold air collects and late spring frosts linger. Now, there's a delicious irony here, because forcing actually depends on winter cold. Rhubarb needs a proper spell of chilly weather to break its dormancy, and in most of the UK, normal winter weather provides that naturally. The problem with frost pockets isn't winter cold, it's the late frosts that can scorch emerging outdoor stems in spring. Ordinary open ground gives the crown all the chill it needs without the damage.
Preparing the ground and planting
Here's how I go about planting a crown — and this is a job you can do this very week, provided the ground isn't frozen solid or sodden.
Dig deep
Cultivate the planting area to around 60cm deep, removing perennial weeds as you go. Couch grass and bindweed tangled in a rhubarb crown are a misery to remove later, so be ruthless now.
Feed the hole
Work a bucketful of well-rotted manure or garden compost into each planting hole. It must be well rotted — fresh manure against a crown is asking for trouble.
Add a balanced fertiliser
Rake a general-purpose balanced fertiliser into the top 20cm of soil before planting, following the pack rates. It gives the young roots something to find straight away.
Set the crown at the right depth
Plant so the tip of the crown, where the buds emerge, sits just above the soil surface. Burying it invites rot, particularly on wet, heavy soils.
Firm, water, label
Firm the soil gently around the crown, water if the ground is dry, and mark the spot. Dormant crowns vanish completely in winter and are remarkably easy to stand on.
Space crowns 75–90cm apart. It always looks absurdly generous on bare soil in November. By June it won't.
The hardest part: leave it alone
Don't pick anything in the first year after planting. Let every leaf grow and feed the roots. Take only a few stems in year two, and from year three onwards you can harvest properly. Forcing should wait until the crown has had at least two full growing seasons in the ground — a newly planted crown simply hasn't the reserves to cope.
Annual Care Calendar: Keeping Crowns Vigorous Enough to Force
Forcing is essentially a withdrawal from the plant's savings account. The crown spends energy it stored the previous summer to push out those pale stems, with no leaves to top it back up. So the better you look after a crown through the year, the healthier the balance when you come to force it. Rhubarb is low-maintenance, but "low" isn't "no".
| When | What's happening | Jobs to do |
|---|---|---|
| November–December | Crowns dormant; leaves dying back | Clear dead foliage, plant new crowns, divide old clumps, choose which crown to force and let it get a good chill |
| January–February | Forcing under way | Check forced crowns, leave unforced crowns undisturbed, pick forced stems when ready, remove covers after 8 weeks at most |
| March–April | Outdoor growth resumes | Apply balanced granular fertiliser, mulch around crowns, start the outdoor harvest, snap off flower stems |
| May–June | Main harvest | Pick no more than a third of the stems at once, water in dry spells, keep removing flower stems |
| July–August | Rebuilding reserves | Stop harvesting, let the leaves feed the crown, water during prolonged drought |
| September–October | Leaves begin to yellow | Tidy, weed, plan divisions and new plantings |
Right now: mid-November
This is a busy, quietly important moment. The leaves have mostly collapsed into slimy heaps — clear them away, as rotting foliage around the crown harbours slugs and fungal problems. It's also prime planting and dividing time, so if you've been meaning to start a rhubarb bed or split an old clump, now is the moment.
Most importantly, decide which crown you're going to force this winter. Pick your strongest established plant — one that cropped well this year and wasn't forced last winter. Then, for the time being, do nothing. Let the frosts get at it. That cold is what primes the crown to grow when you cover it.
January–February
Forcing takes centre stage. The covered crown is busy in the dark; the others should be left completely alone to wake in their own time. Peek under the forcer every week or so once the cover's been on a while, and harvest stems as they reach size. Whatever happens, don't leave a forcer in place for more than eight weeks — after that, the crown needs light to start rebuilding.
March–April
The outdoor season begins. Scatter a balanced granular fertiliser around each crown as growth gets going, and top-dress with well-rotted manure or compost around (not heaped directly onto) the crown. Keep an eye out for flower stems — thick, hollow, fast-growing spikes topped with a bulbous bud. Bolting diverts a great deal of energy into seed production, so snap these off at the base as soon as you spot them.
May through to autumn
Keep picking, but stop by the end of June or so. Through July and August, the leaves need to do their work uninterrupted, photosynthesising away and packing energy back into the roots ready for next year. A crown you're planning to force next winter benefits enormously from a full, unharvested late summer. Water during long dry spells, particularly on light soils, as drought-stressed plants bolt more readily.
A crown that has just been forced should not be harvested at all for the rest of that year. Remove the cover, feed and mulch it, let it grow freely all summer, and it should be ready for normal picking the following spring — and for forcing again the winter after that, at the earliest.
Dividing Clumps: When, Why, and Exactly How to Split Rhubarb
If you've inherited an elderly rhubarb clump — and most allotment holders eventually do — this is the section for you. Division is rejuvenation and free plants rolled into one job, and frankly, it's one of the more satisfying bits of winter gardening. There's something cathartic about putting a spade through a crown the size of a footstool.
Why divide at all?
Rhubarb crowns grow outwards and upwards over the years, sending up more and more buds from an increasingly woody, crowded centre. Somewhere around five to ten years old, congested clumps begin to decline. The plant is spreading its energy across too many growing points, and the stems come up thinner, shorter and less juicy. Splitting the clump rejuvenates the plant and gives you several new crowns at no cost — ideal if you want to build up stock for a forcing rotation.
Signs a clump needs dividing
- Lots of thin, spindly stems instead of fewer, thicker ones.
- A crowded, congested centre, sometimes with a hollow or dead patch in the middle.
- A gradual decline in vigour over two or three seasons, even with decent feeding.
- An increase in flowering stems, often a sign of a stressed plant.
When to do it
There are two good windows: October to November, once the foliage has died back, or February to March, just before growth resumes. Both avoid the period of active growth. Right now is ideal — the soil still carries some warmth, and divisions planted now get a head start on rooting before spring.
One caveat: if you plan to force a crown this winter, don't divide that particular one. A freshly split piece has neither the roots nor the reserves to take forcing.
How to divide, step by step
1. Clear and expose
Remove any remaining dead foliage and scrape away the surface soil so you can see the crown and its buds clearly.
2. Lift or split in place
Either dig up the whole clump (heavy work) or slice sections from the edge with a sharp spade, leaving the parent in the ground. Lifting gives you more control; splitting in place is kinder on the back.
3. Cut into sections
Use a spade or sharp knife to cut the crown into chunks, each with at least one strong, plump bud and a good portion of healthy root. Pieces roughly the size of your fist or larger establish most reliably.
4. Discard the old centre
The woody, tired middle of an old clump is rarely worth replanting. Throw out anything soft, discoloured or rotten — don't spread problems into your new bed.
5. Replant promptly
Plant the divisions straight away in freshly prepared ground, following the same planting method as for new crowns. Avoid replanting into exactly the same spot the old clump occupied if you can — fresh soil gives the divisions a better start.
Build a forcing rotation
Treat newly planted divisions just as you would new crowns: no picking in the first year, light picking in the second. Plant three good divisions now and, in a couple of years' time, you'll have enough established crowns to force one each winter whilst the others rest and crop outdoors. That's the secret to forced rhubarb every January without wearing out a single plant.
The Forcing Method: Buckets, Terracotta Pots, and DIY Solutions Compared
Strip away the romance and forcing comes down to two things: total darkness and a little extra warmth. Darkness causes the etiolation — those pale, tender stems with their gentler flavour. Warmth, often supplied by a mulch of decomposing manure or straw around the cover, nudges the crown into growth sooner. Everything else is a matter of taste, budget and what you have lying about in the shed.
Method 1: The traditional terracotta forcer
These are the elegant, bell-shaped clay pots with a removable lid on top — the kind you'll see gracing the kitchen gardens of country houses. The lid lets you check progress without disturbing the whole thing, and the thick clay walls provide good insulation, holding a little warmth and buffering the crown against sudden temperature swings.
Size matters. A forcer around 30–45cm in diameter suits most crowns, though a mature clump might need something larger. Height matters too: the stems need room to stretch to their full 20–30cm or more without being squashed against the lid. Handmade forcers from potteries such as Whichford Pottery are things of real beauty, and they're often sold by specialist garden suppliers.
The downsides? They're an investment, they're heavy, and like any terracotta they can crack in hard frosts, especially if they sit in wet soil. Personally, I think they earn their place in a garden where they'll be seen and enjoyed year-round — they look lovely even when there's nothing under them.
Method 2: The plastic bucket or dustbin
This is how most of us force rhubarb, and it works very well. Any large, opaque container upended over the crown will do, provided it's completely lightproof. Hold it up to the sun and look inside: any pinprick of light means green-tinged stems, so cover drainage holes, cracks and handle holes with thick tape. Black plastic is best; pale or translucent buckets let too much light through.
For mature crowns, go big — a 50-litre bin or larger gives the stems room to grow without hitting the base. Weigh it down with a brick or two, or it'll end up in next door's garden after the first proper winter gale.
Method 3: DIY and improvised forcers
Gardeners have always been inventive here. An old chimney pot capped with a slate, a stack of old tyres topped with a board, a wooden box knocked together from offcuts, even an upturned galvanised dustbin — anything tall, dark and sturdy will work. Whatever you use, insulation helps: packing straw around the outside of the forcer, or banking well-rotted manure against it, adds warmth and protects the crown during severe cold.
There's also the "proper Yorkshire" route: lifting a crown entirely after it has had a good chill, popping it into a large pot or box of soil and bringing it into a dark shed, garage or cellar. This produces stems sooner still, but a lifted crown is usually so exhausted afterwards that it's best composted. I'd only do it with a spare division.
| Feature | Terracotta forcer | Plastic bucket / bin | DIY (box, chimney pot, tyres) |
|---|---|---|---|
| Light exclusion | Excellent with lid on | Excellent if holes taped | Depends on build — check for gaps |
| Insulation | Good — thick clay walls | Modest; benefits from straw packing | Variable; wood insulates well |
| Checking progress | Easy — lift the lid | Lift the whole bucket | Depends on design |
| Cost | An investment | Cheap or free | Usually free |
| Durability | Can crack in hard frost | Long-lasting; can become brittle in sunlight | Variable |
| Looks | Beautiful, ornamental | Functional at best | Charmingly rustic, or just rubbish |
Forcing: the good bits
- Tender, sweeter, beautifully coloured stems in late winter
- Harvest weeks ahead of uncovered plants
- Works with nothing more than a lightproof bucket
- Very little hands-on time once the cover's in place
- Thin-skinned stems that rarely need stringing
Forcing: the trade-offs
- Seriously drains the crown — needs a full year's rest afterwards
- Smaller total harvest than an unforced plant
- Requires a crown at least three years established
- Slugs love the dark, damp conditions under a forcer
- Terracotta forcers are costly and frost-vulnerable
Step-by-Step Forcing Timeline: From First Frost to First Harvest
Forcing is a gentle sequence rather than a single job. Get the order right and it practically runs itself.
Before you start: the prerequisites
Two things must be in place. First, the crown must be at least three years established, healthy, and not forced the previous winter. Second, it must have experienced a proper spell of cold to break its dormancy. Rhubarb needs this chilling before it'll respond to forcing. In most UK winters, the crown will have had plenty by the turn of the year, which is why many gardeners wait until after a few good frosts before covering up. Covering too early, in a mild autumn, can mean the crown simply sits there doing very little.
Mid-to-late November (now)
Choose your crown. Clear away all the dead leaves and debris around it, pull out any weeds, and check for slugs hiding in the crown — they'll have a field day in the dark later. Then leave it exposed to the weather. Frost is your friend at this stage.
December to January: mulch and cover
Once the crown has had a decent chill — and in colder parts of the country, that can be fairly soon — it's time to prepare it. Apply a thick mulch of well-rotted manure or compost, around 7–10cm deep, around the crown. Keep the very centre where the buds sit fairly clear, or use only a light, crumbly layer there; heavy, wet material packed directly onto the buds can encourage rot. The decomposing mulch gives off a little gentle warmth that helps the crown into growth.
Then place your forcer over the crown, making sure no light can creep in around the base — push it slightly into the soil or bank soil up around the rim. If the weather turns severe, pack straw around the outside of the forcer, or bank more manure against it, for extra insulation. Many gardeners prefer to cover from late December into January; there's no prize for being first, and a properly chilled crown responds faster.
Weeks one to three: patience
Not much will appear to happen. Under the cover, the buds are swelling and beginning to push. Resist the urge to lift the lid every other day — each peek lets in light and cold. A quick check every week or two is plenty, mainly to keep an eye out for slugs.
Weeks four to six: stems appear
Depending on the weather and variety, pale shoots will start to stretch upwards, with tiny yellow leaves furled at their tips. Growth accelerates quickly once it gets going. Early varieties such as 'Timperley Early' can be ready for picking by January or February from a December covering.
Weeks six to eight: harvest
Typically, stems are ready to pick around six to eight weeks after covering, once they're 20–30cm long. Harvest them — more on technique in the next section — and then remove the cover entirely. Eight weeks under a forcer is the absolute maximum; beyond that, you're just starving the plant.
After forcing: recovery
Once the cover's off, the crown will produce a few more stems in the light. Leave them. Give the plant a feed of balanced fertiliser and a mulch of well-rotted organic matter around it, and let it grow freely for the rest of the year with no harvesting at all. It'll take at least a full season to recover, and it shouldn't be forced again the following winter.
Mind the weather when uncovering. Forced stems and leaves are soft and pale, and a sharp frost can damage them if they're suddenly exposed. If you uncover during a cold snap, protect the crown with fleece for a few days whilst the new growth toughens up.
Harvesting, Storing, and What to Do with Your Forced Stems
This is the moment. You lift the forcer, and there they are — a cluster of glowing pink stems in the gloom, like something from a Victorian conservatory. Take a moment to admire them. Then harvest them properly, because how you pick makes a real difference to the crown's health.
When is a stem ready?
Look for stems of 20–30cm in length that feel firm rather than floppy. The colour will be anything from pale shell pink to crimson. Don't be alarmed that they aren't the deep red of some outdoor stalks — that's entirely normal for forced rhubarb, and the pale colouring is part of its charm. The leaves will be small and yellowish; that's fine too.
Pull, don't cut
The correct technique is to grasp the stem low down, near the base, and pull it outwards and downwards with a gentle twist. A ready stem will come away cleanly from the crown with a satisfying little pop. Don't cut stems with a knife — it leaves a stump that can rot and potentially let disease into the crown. Forced stems are tender, so be a bit gentler than you would with sturdy outdoor ones.
How much to take
For a forced crown, restraint is everything. The plant has burned through a large part of its stored energy to produce those stems, and with no green leaves, it has had no way of topping up. Pick the forced stems as they reach size, then stop completely: take nothing more from that crown until next year. I know it's tempting to go back for the outdoor stems that follow. Don't. You want this crown to still be cropping in five years.
For unforced outdoor crowns later in spring, the rule is never to strip a plant bare: take no more than about a third of the stems in any one picking session, and stop harvesting by around the end of June.
The leaves are not for eating
Rhubarb leaves contain high levels of oxalic acid and are toxic, so trim them off as soon as you've picked and never eat them. They're perfectly fine to add to the compost heap, where they'll break down like any other green waste. The small yellow leaves on forced stems are no exception.
Storing forced stems
Forced rhubarb is at its best eaten fresh, but it keeps reasonably well. Trim the leaves, wrap the stems loosely and store in the salad drawer of the fridge for several days. For longer storage, chop into short lengths and freeze — there's no need to blanch. Frozen rhubarb softens on thawing, so use it for cooking rather than anything that needs a crisp stem.
What to make
Forced rhubarb deserves dishes that show off its colour. Poach lengths gently with a little sugar and orange zest until just tender — keep the heat low and they hold their shape beautifully, sitting in a syrup the colour of rosé wine. It makes a wonderful fool folded through whipped cream or custard, a delicate tart on puff pastry, or a sharp, pretty compote with yoghurt for breakfast. And, of course, there's crumble. There's always crumble. Because forced stems are naturally sweeter and more tender, you'll find you need noticeably less sugar and less cooking time than with tough summer stalks.
Colour tip: to keep that lovely pink, avoid overcooking and stirring vigorously. Bake or poach whole lengths in a single layer, and they'll stay vivid. Boil them hard and you'll end up with a perfectly tasty but rather beige mush.
Kit that makes this easier
A few tools that help with the jobs above. We link to the exact model on Amazon UK.
Spear & Jackson Select Stainless Digging
Useful for preparing the planting site and lifting an established rhubarb crown when dividing or replanting it. Having both tools makes it easier to loosen the soil without relying on a single digging tool.

Check today's price: Spear & Jackson Select Stainless Digging on Amazon UK
Okatsune 103 Bypass Secateurs
Useful for cutting away dead foliage and unwanted flower stalks during the annual care routine. Clean, controlled cuts help keep the crown tidy without damaging nearby growth.

Check today's price: Okatsune 103 Bypass Secateurs on Amazon UK
Troubleshooting and Common Questions
Rhubarb is tough, but it does have a few weak spots, and forcing introduces one or two quirks of its own. Here are the questions I hear most often — and the answers I wish I'd known when I first started.
Final Thoughts: Your Rhubarb Plan for This Winter
If there's one thing to take away, it's that rhubarb rewards a bit of forward thinking. The forced stems you pull in a grey January are the product of last summer's leaves, this November's planting and dividing, and a sensible decision not to be greedy.
So here's what I'd do this week, whilst the soil is still workable and the crowns are fully dormant. If you haven't got rhubarb, buy a bare-root crown of an early variety — 'Timperley Early' or 'Stockbridge Arrow' if forcing is the goal — and plant it in deep, rich, well-drained soil. If you've got a tired old clump, split it and replant the best pieces. And if you have an established crown that wasn't forced last winter, clear its dead leaves, let the frost do its work, and get your bucket or forcer ready for the turn of the year.
Then, come January or February, lift the cover and enjoy one of the small, genuine thrills of the gardening calendar: fresh, sweet, pink stems from a plot that otherwise looks fast asleep.
The GardenScout Verdict
Forcing rhubarb is one of the easiest and most rewarding winter projects in the kitchen garden. You need an established crown, a proper winter chill and something completely lightproof to put over it — a terracotta forcer if you want beauty, an upturned bin if you want results without the outlay. The real skill lies in looking after the crown: plant it well, feed it, divide it when it's tired, take only a handful of forced stems and give it a full year off afterwards.
Do that, rotate your forcing between two or three crowns, and you'll have tender, sweet, glowing pink rhubarb every winter for years to come. Start now, in November, and you'll thank yourself in January.
- Spear & Jackson Select Stainless DiggingBest for planting and dividingView on Amazon
- Okatsune 103 Bypass SecateursBest for crown careView on Amazon
Buying for a gardener? See our gifts for vegetable growers, checked on Amazon every day.