
How to Grow Runner Beans and French Beans up Wigwams
A simple circle of canes can turn a sunny patch into a productive green tent: here is how to sow, support, water and keep climbing beans cropping all summer.
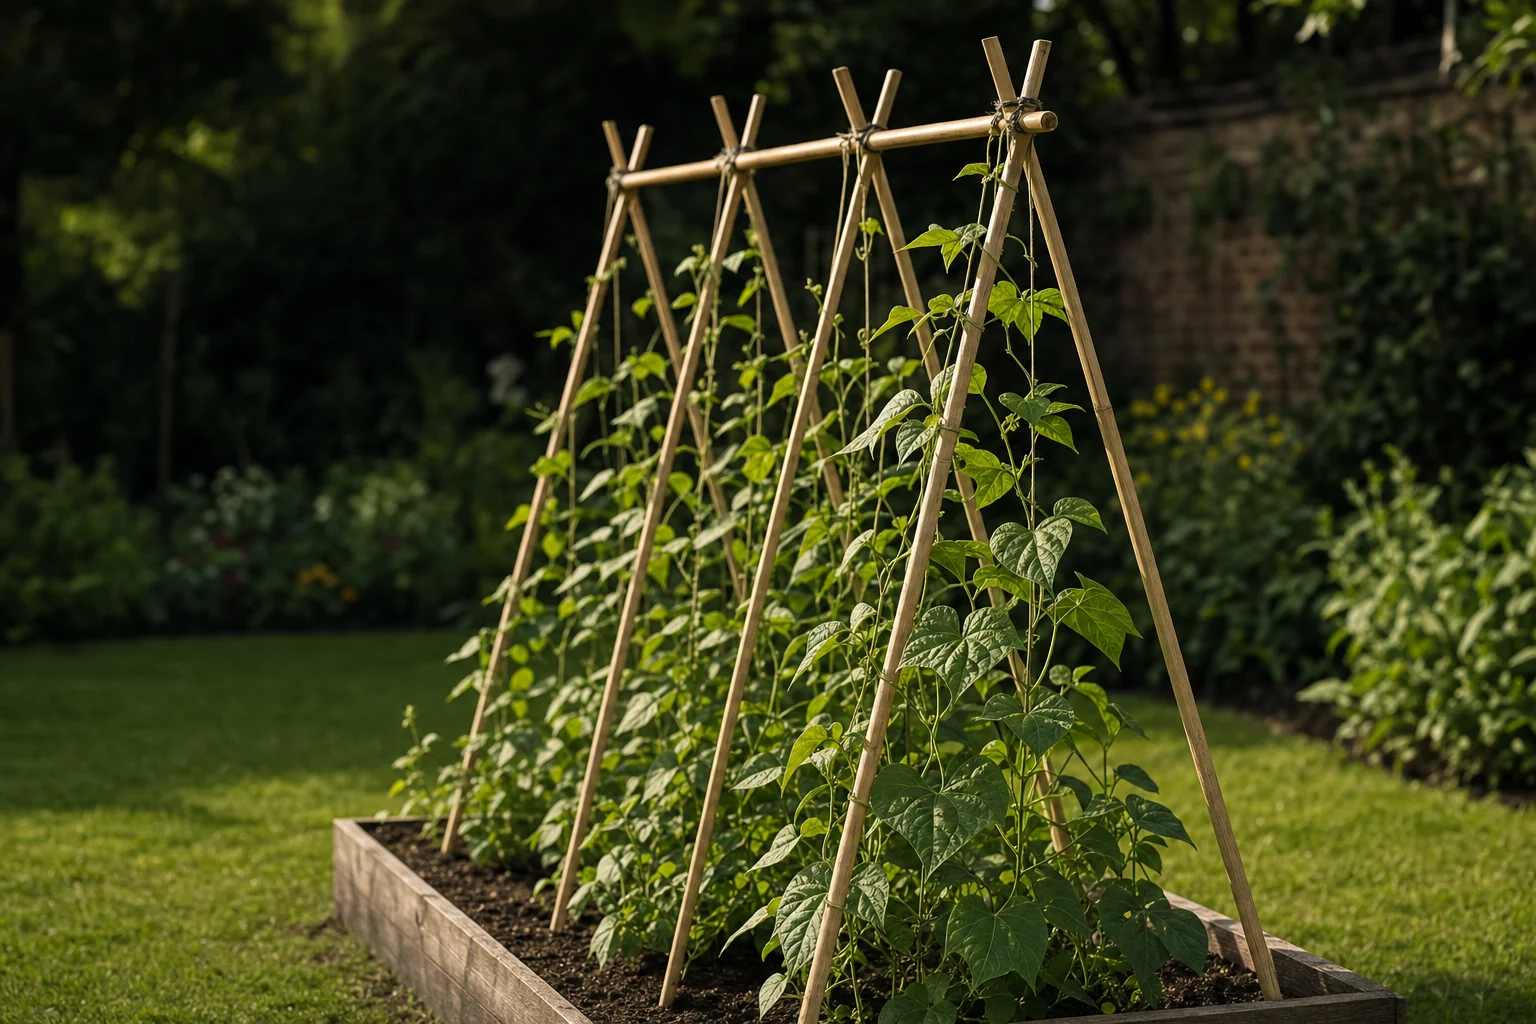
Why Wigwams Work: The Case for Growing Climbing Beans on Pole Supports
A wigwam is one of those bits of garden kit that looks almost too obvious to deserve much thought. Push several canes into the soil, tie their tops together, plant beans around the bottom. Job done. Except it is not merely a charmingly rustic shortcut. For runner beans and climbing French beans, the wigwam is a very efficient answer to the awkward fact that these plants would much rather go up than spread out.
Runner beans are vigorous climbers capable of reaching around 2–3 metres. Given a solid pole, they waste no time. Their stems spiral upwards, leaves fan outwards and flowers arrive along the vertical framework rather than disappearing into a sprawling tangle across the veg bed. A proper wigwam channels all that enthusiasm into a compact footprint. It makes harvesting easier, keeps the planting area orderly and gives you something handsome to look at whilst you wait for supper.
That last bit matters more than practical gardeners sometimes admit. A bean wigwam is useful, yes, but it is also one of the few vegetable supports that can look deliberately decorative without trying too hard. By July, it becomes a leafy tent flecked with runner bean flowers or climbing French bean blooms. In a kitchen garden, a mixed border or the edge of an allotment plot, it brings height without demanding a permanent trellis. It is the vegetable equivalent of putting a good lamp in a gloomy corner.
The small-garden advantage
A wigwam gives climbing beans a vertical route whilst keeping their roots gathered within one circular planting area. This is particularly useful where a long traditional row of canes would eat into paths, lawn edges or the small amount of open ground you had mentally reserved for everything else.
Flat rows of canes still have their place. On a large allotment, especially where you are growing plenty of runner beans for freezing, a long double row can be sensible. It is easy to water, easy to net if needed and it makes picking a steady, repetitive job. Wigwams are more flexible, though. You can tuck one into a sunny bed, grow two at the corners of a raised bed, or use one as a productive centrepiece in a square plot. The structure itself takes little planning beyond making sure it is properly anchored.
Air circulation is another quiet benefit. A wider, well-made wigwam creates space between plants and around the centre. This helps foliage dry after rain and makes it easier to see what is happening at the base of the plants. You are more likely to spot a slug party, a dry patch of soil or a cluster of blackfly before the situation becomes a full-scale bean emergency.
The real caveat is wind. A flimsy wigwam can look perfectly fine in June and then reveal its weaknesses when it is carrying full foliage, developing pods and the after-effects of a wet, blustery afternoon. The taller the beans, the more leverage the wind has. So think of the finished structure as a seasonal framework with a considerable leafy sail attached. Tie it well. Push it in deeply. Do not assume optimism is a structural material.
Know Your Beans: Runner vs Climbing French — Choosing the Right Variety for Your Wigwam
Both runner beans and climbing French beans are excellent wigwam crops, but they are not interchangeable. They climb in broadly the same way and enjoy the same sunny, sheltered position, yet they differ in pod style, flower colour, speed and behaviour in difficult weather. Picking the right type is less about finding a winner and more about deciding what you actually want to eat, how much room you have and how reliably your garden holds moisture.
Runner beans are the traditional British favourite. They are generous plants, often dramatic plants, and they tend to produce large pods around 20–30 cm long. Depending on the variety and how young you pick them, the pods can be sliced and cooked as green beans, while the beans inside can later be eaten fresh as shelling beans or dried. They are an especially satisfying crop for gardeners who like the kitchen garden to look alive rather than merely functional.
Classic runner varieties include Enorma, Scarlet Emperor, Painted Lady and White Lady. Their flowers may be red, white or bicoloured, and that flowering display is a large part of the appeal. Scarlet Emperor is the familiar showstopper sort of runner bean: it is difficult to miss, even when you are meant to be checking whether the washing has dried. Painted Lady brings bicoloured flowers, whilst white-flowered forms can sit more quietly in an ornamental scheme.
Climbing French beans produce slimmer, more tender pods, usually around 10–15 cm long. Picked young, they do not require stringing, which makes them a very practical option for quick summer meals. They can also be more varied in colour: green varieties such as Cobra, purple types such as Blauhilde, and yellow-podded choices including Golden Gate. Their flowers are generally white or lilac rather than the bold red often associated with runners.
| Feature | Runner beans | Climbing French beans |
|---|---|---|
| Pod style | Broad, substantial pods around 20–30 cm long | Slimmer, tender pods around 10–15 cm long |
| Eating quality | Pods, fresh shelling beans or dried beans can be used | Best picked young for tender, string-free pods |
| Flower colour | Red, white or bicoloured | Usually white or lilac |
| Life cycle in the UK | Grown as an annual, although perennial in warm climates | A true annual |
| Speed to maturity | Usually later | Typically around two weeks faster |
| Useful varieties | Enorma, Scarlet Emperor, Painted Lady, White Lady | Cobra, Blauhilde, Golden Gate, Purple Teepee climbing |
The speed difference is worth considering if your season is short, your site is cool or you simply hate waiting. Climbing French beans are true annuals and generally reach picking stage roughly two weeks earlier than runners. That can make a real difference in a northern garden or a late-starting year. It also means French beans are often useful for filling the gap before runner beans reach their stride.
Runner beans, however, have a talent for abundance once they settle. They are hungry, thirsty plants with a reputation for producing for months when well watered and picked regularly. Their weakness is flower drop. Hot, dry weather can make them grumpy, and the result is plenty of flowers but fewer pods than you had imagined whilst building the wigwam in spring. French beans can prove more reliable in very dry summers, although neither crop enjoys being left thirsty during flowering.
Choose runners for versatility
Runner bean pods can be picked young, or allowed to mature for the beans within. They are a good fit for gardeners who enjoy a traditional crop with more than one culinary use.
Choose climbing French beans for speed
They are generally quicker to maturity and give neat, tender pods for frequent picking. If you want the first beans on the plate sooner, this is a persuasive point.
Choose by appearance as well as appetite
Red runner bean flowers are wonderfully conspicuous, but purple, yellow and green French bean pods can add a surprising amount of colour to an edible border.
Match the bean to your summer
If dry spells are common and watering is not always practical, climbing French beans may be the less temperamental choice. Runners reward attention, but they do notice when it is absent.
There is no rule against growing both. In fact, a pair of wigwams makes an excellent small experiment: runner beans on one, climbing French beans on another. You will quickly see which one suits your soil, local weather and cooking habits. Gardening advice is useful; watching what your own patch does is better.
Sowing Calendar: Getting the Timing Right for a Long UK Season
Beans are tender. It is one of the first facts to remember and one of the easiest to ignore when a mild April weekend has persuaded everyone that summer is already here. Runner beans and French beans dislike frost, dislike cold soil and are unlikely to reward a premature outdoor sowing with heroic growth. Waiting a little is nearly always less frustrating than trying to rescue cold, stalled seedlings.
For direct sowing outdoors, wait until the soil has warmed to at least 10–12°C. In much of the UK, that means mid-May at the earliest, and often later in cooler, exposed or northern gardens. The calendar is a guide, not a command. A sheltered south-facing town garden can warm faster than an open allotment. Conversely, a breezy plot on heavy ground can still feel distinctly spring-like long after the garden centre has started selling summer bedding plants.
Indoor sowing offers a useful head start. From late April, sow one seed per pot or root trainer, using 7–9 cm pots and placing the seed around 5 cm deep. Keep them warm at around 18–20°C. Runner beans usually germinate in 7–14 days; French beans generally take around 7–10 days. Use a decent-sized pot from the start. Beans make strong roots quickly and do not benefit from being repeatedly moved, squeezed or generally treated like a houseplant that has overgrown its windowsill.
Harden off indoor-raised plants. Before planting them on the wigwam, gradually introduce seedlings to outdoor conditions. Tender seedlings moved straight from a warm windowsill or greenhouse into a cold wind can sulk, scorch or stop growing just when you were hoping for momentum.
Root trainers are useful where available because they encourage a straighter root system, but ordinary 7–9 cm pots work perfectly well. The important thing is to avoid overcrowding. One bean per pot gives each seedling room to develop without roots tangling together. It also makes planting day simpler: tip out the root ball, place it beside a cane, firm it in, water it thoroughly. No complicated disentangling. No accidental bean surgery.
Sow in succession for a longer season
Instead of sowing every seed on the same day, make a small second sowing after the first batch is established. This spreads risk if slugs or cold weather catch one planting, and it can keep fresh plants coming as the earliest ones begin to tire.
When seedlings have emerged, give them plenty of light and do not let the compost dry completely. They should be sturdy rather than stretched. A long, pale, leaning seedling may still grow, but it has started life at a disadvantage. Beans need to climb; they do not need to arrive at the cane already looking as though they have had a difficult night out.
Plant out only after the danger of frost has passed. Put one plant at the base of each cane, or sow directly in the same positions. Water immediately after planting. The first few days matter: roots need moisture around them, shoots need guiding, and local molluscs need discouraging with whatever sensible protection method you prefer. It is much easier to establish a healthy plant than to coax a nibbled stump into greatness.
Building Your Wigwam: Materials, Height, Spacing and Structural Know-How
A bean wigwam does not need specialist engineering, but it does need a little more care than simply leaning a few canes together and hoping the beans will act as decorative cable ties. The eventual crop can be surprisingly heavy. Leaves catch wind, rain adds weight and runner beans in full production are not delicate little things. Build for August, not for the innocent-looking seedlings of May.
For a standard bean wigwam, use six to eight canes, each around 2.4 metres, or 8 feet, long. Taller is generally better than shorter because runner beans can reach the top and keep trying. A too-short support leaves stems clumping at the apex, making the structure dense and harder to pick. A taller wigwam allows you to pinch out the growing tips once they reach the top, rather than having plants immediately fold over and argue amongst themselves.
Arrange the canes in a circle roughly 60–90 cm across. At ground level, push each cane 20–25 cm into the soil. A wider circle improves air movement, gives roots more room and makes it easier to access the middle if you need to weed or water. It also creates a less cramped tunnel of foliage later on. There is a temptation to make the base as small as possible, especially in a tiny garden, but a mean little circle produces mean little access.
Start with a generous base
A 60–90 cm diameter gives plants enough separation to breathe and leaves a useful watering zone around the base of the wigwam.
Anchor canes deeply
Push each cane 20–25 cm into firm soil. In a very exposed garden, make the structure sturdier rather than assuming the crop will somehow protect it from wind.
Bind the apex firmly
Gather all the canes at the top and tie tightly with garden twine, or use a wigwam ring. This join carries the load for the entire season.
Leave a route to reach in
Do not build the planting circle so tightly that watering and picking become a puzzle involving one arm, a bruised shoulder and a dropped handful of beans.
Garden twine is usually all that is needed to secure the top. Wind it around the gathered canes several times, pull it tight and knot it securely. A wigwam ring can make assembly tidy and repeatable, but the key thing is that the top does not wobble. Test it before planting. Give the structure a firm but sensible shake. If the canes shift alarmingly now, they will not become more trustworthy after several months of growth.
Build before you plant
Install the full wigwam before sowing or planting around it. Trying to push long canes into the soil after seedlings are established is an excellent way to damage roots, snap shoots and discover that your sense of spatial awareness was optimistic.
Position also matters. Beans need sun and benefit from shelter, especially runners. Avoid an exposed frost pocket or a site where the ground dries out immediately after rain. If the wigwam sits in a border, remember that it will cast shade as the season progresses. That can be useful for a shade-tolerant companion, but less useful if it falls across the only patch where you intended to grow something equally sun-hungry.
Soil Preparation and Feeding: What Beans Need Before They Even Go in the Ground
Beans look exuberant above ground, but their success starts with rather sensible soil. Runner beans and French beans like a moisture-retentive yet free-draining bed. That phrase appears in gardening advice so often it can begin to sound like wallpaper, but it genuinely describes the sweet spot: soil that holds enough water to support fast growth, without becoming so saturated that roots struggle for air.
Ideal soil pH is around 6.0–7.0. Beans can perform poorly in very sandy ground, where water vanishes too quickly, and in waterlogged ground, where roots sit cold and wet. Neither extreme is a bean's idea of a pleasant summer. If your soil is light and sandy, focus on improving its capacity to hold moisture. If it is heavy, avoid compaction and do not plant into a patch that remains sodden after rain.
As legumes, runner beans and French beans fix atmospheric nitrogen through nodules on their roots. That means they generally need less added nitrogen than many other vegetables. This is one of the easiest places to go wrong. It is understandable: plants look leafy, gardeners think feed, and suddenly the beans have become impressive green sculptures with rather fewer flowers and pods than expected.
What helps beans
- Moisture-retentive soil that still drains freely.
- A pH around 6.0–7.0.
- Ground prepared before planting, so roots can establish without interruption.
- Moderate feeding rather than a nitrogen-heavy routine.
What holds them back
- Waterlogged soil that deprives roots of air.
- Very sandy soil that dries rapidly.
- High-nitrogen fertilisers during the main season.
- Overly rich feeding that encourages foliage at the expense of pods.
Before planting, clear weeds and loosen the ground around the wigwam site. You do not need to turn this into an elaborate excavation project. The aim is simply to make a workable planting area where water can soak in and young roots can spread. A tidy soil surface also makes early slug monitoring easier, which is less glamorous than admiring flowers but considerably more useful.
Resist the urge to overfeed
If your bean plants are producing masses of lush foliage but disappointing flowers and pods, think before adding more fertiliser. Excess nitrogen can send growth in exactly the wrong direction: all leaves, no useful harvest.
Once plants are growing, consistent watering does more for productivity than indiscriminate feeding. Beans are not a crop to pamper with constant nutritional tinkering. They want their roots comfortable, their support secure and their flowers supplied with enough moisture to set pods. It is not glamorous advice. It is also the advice that keeps a wigwam productive instead of merely photogenic.
A layer of mulch around, but not pressed against, the stems can help maintain even soil moisture. This is particularly helpful in dry weather and on lighter soils. The point is to reduce evaporation and smooth out the swings between soaked and parched. Beans tolerate neither drama nor neglect especially well, which does make them sound faintly aristocratic. In practice, they simply reward routine.
Watering at the Critical Moment: Flowering, Pod Set and Why Timing is Everything
If there is one moment when your bean watering routine matters most, it is when flower buds appear and flowers begin to open. This is the stage that decides whether your handsome green wigwam becomes a proper crop or an architectural tribute to potential. Consistent soil moisture is essential for pod set, especially with runner beans, where blossom drop is a famously frustrating cause of poor harvests.
Runner beans are notorious for shedding flowers in hot, dry conditions. The issue is not always just what is happening in the soil: atmospheric humidity can play a part too. But dry roots certainly do not help. A plant under stress may carry plenty of flowers and still fail to make pods, leaving you with the peculiar disappointment of something that looks full of promise from the kitchen window but offers very little at picking time.
Climbing French beans can often cope better than runners in a very dry summer, but they still produce best when their watering is steady. The practical lesson is not that runner beans are impossible in warm weather. It is that they need attention at precisely the stage when it is easiest to assume the job is finished because the plants are tall and leafy. It is not finished. It has merely reached the bit where good habits start paying dividends.
During dry flowering weather, aim for a deep watering of approximately 5–10 litres per plant every 2–3 days. Apply it to the soil around the roots rather than sprinkling the leaves. The goal is to wet the root zone properly, not to give the surface a brief and theatrical glisten.
Deep watering encourages roots to explore lower into the soil. Shallow, frequent watering does the opposite: it keeps roots near the surface, where they are more vulnerable when the next hot spell arrives. This is why a proper soak every few days is more useful than a quick daily splash. A bean plant should not have to base its entire summer strategy on whether you remembered the hose before breakfast.
Water early or later in the day if you can, and direct it at the soil. Overhead watering is not ideal, particularly if you are trying to avoid spreading disease by rain-splash-like conditions. A watering can, hose or irrigation method is less important than consistency. The plants do not care whether your equipment looks impressively professional. They care whether water reaches their roots when they need it.
Flowers are your watering signal
The first flower buds are the cue to take watering seriously. Do not wait until plants visibly wilt. By then, they have already experienced stress at the very point when successful pod set matters most.
Mulching helps here too, particularly around a wigwam where several plants share a relatively compact area. Check the soil before watering rather than treating every dry-looking surface as an emergency. A mulch can leave the top looking dry whilst the ground beneath remains satisfactorily moist. Push a finger into the soil near the root zone and let that, rather than the colour of the surface, guide you.
As pods develop, continue the same even routine. Inconsistent watering can lead to uneven growth and a less satisfying crop. You do not need to turn the garden into a military operation. Just avoid the familiar pattern of ignoring the beans for a week, panicking during a hot day, soaking them excessively, then disappearing again. Beans favour calm competence. Fair enough, really.
Training, Tying and Troubleshooting: Getting Beans to Climb Where You Want Them
Climbing beans are twining plants, which makes them obliging once they are pointed in the right direction. Young shoots naturally wind anticlockwise around a support. Your role is simply to introduce them to the cane and let them get on with it. This is one of the more satisfying jobs in the vegetable garden because it takes seconds, and within a day or two the plant often looks as though it had the whole plan in mind from the start.
Begin training when seedlings reach around 15–20 cm tall. Take the leading shoot gently and wind it around the base of the nearest cane in its natural anticlockwise direction. Do not force it clockwise. Stems are flexible but not indestructible, and there is no prize for proving that you can out-argue a plant's growth habit.
Follow the natural direction
Beans twine anticlockwise. Guide the leading shoot loosely around the cane and avoid sharply bending the stem.
Start at 15–20 cm tall
At this size, seedlings are long enough to reach the cane but still young enough to be directed without a fight.
Use soft ties only if needed
Soft garden twine or plant clips can steady a reluctant stem, but avoid tight ties that can restrict growth or rub against the plant.
Pinch out at the top
When plants reach the top of the wigwam, usually around 2–2.4 m, pinch out the leading shoot to favour side shoots and pod production.
Most plants only need help once or twice. After that, check every few days, especially early in the season. Shoots can occasionally wander sideways, loop around a neighbouring cane or lean out into open space in search of something to grab. Catching them early keeps the wigwam even and open. Leaving them for a fortnight can turn a simple adjustment into a leafy knot worthy of a woodland myth.
When stems reach the apex, pinch out the growing tips. On a typical bean wigwam this happens at around 2–2.4 metres. Removing the tip prevents plants from piling over the top and redirects energy into side shoots and pod production. It also makes picking more realistic. There is no great pleasure in growing a bean crop that requires a stepladder, a long stick and a mildly reckless attitude to garden furniture.
Keep the centre open
As plants fill the frame, remove only damaged or troublesome growth where necessary, but resist trying to make the wigwam too tidy. You want a leafy structure, not a bare cone. The useful balance is enough foliage for vigour, enough space for air and enough visibility to find the pods.
Regular picking is part of training in the broadest sense: it tells the plant to continue producing. Once pods start forming, inspect the wigwam every couple of days. Young runner beans are more tender than oversized ones, and French beans are at their best before they become bulky. Picking frequently removes mature pods before the plant can settle into seed-making mode. It keeps the crop moving, which is exactly what you want all summer.
Pest, Disease and Problem Solver: Keeping Your Wigwam Beans Healthy All Season
Bean wigwams are cheerful things, but they are not immune to garden trouble. The good news is that most problems are recognisable early if you make a habit of looking closely. A quick inspection whilst watering or picking is usually enough. Check new shoots, look beneath leaves, inspect the soil around the stems and take a moment to notice whether flowers are setting pods. The plants will usually tell you what is wrong. They are not subtle once you learn their language.
Slugs and snails are the number one enemy of bean seedlings. A healthy young bean can be reduced to a chewed stalk overnight, particularly in damp weather. The danger is greatest from sowing until plants are tall enough to grow away from damage. Copper tape around pots, beer traps and biological control using nematodes are all options. Nematodes containing Phasmarhabditis hermaphrodita should be applied when the soil temperature exceeds 5°C.
Black bean aphid, or blackfly, is another frequent visitor. You may find dense clusters around growing tips and beneath flowers. A light infestation is often manageable. Pinch out badly infested tips, encourage ladybirds and lacewings, and avoid reaching immediately for a spray. If intervention is needed, insecticidal soap can be used as a last resort. The aim is control rather than achieving an impossible insect-free garden. Ladybirds need something to eat too, after all.
Early action works best
- Check seedlings frequently for slug and snail damage.
- Pinch out blackfly-covered growing tips before colonies spread.
- Encourage ladybirds and lacewings around the garden.
- Water the soil rather than routinely soaking foliage.
Avoid making problems worse
- Do not leave young plants unprotected in slug-prone conditions.
- Do not overfeed nitrogen when foliage is already excessive.
- Do not use overhead watering where disease risk is a concern.
- Do not compost obviously diseased material into the growing area.
Halo blight is a bacterial disease caused by Pseudomonas syringae pv. phaseolicola. It causes pale halos around leaf spots and can spread through infected seed and rain splash. Prevention is much easier than trying to manage a problem once it is established. Start with certified disease-free seed, avoid overhead watering and do not handle plants when they are wet if you can help it. A wigwam with decent spacing is useful here because it encourages foliage to dry more readily.
The clean-start principle: healthy seed, warmed soil, sturdy supports and sensible watering solve more bean problems than complicated interventions later in the season. Most dramatic-looking troubles begin with one small stress that was easy to overlook.
Flower drop deserves a final mention because it can feel like a disease when it is often a growing-condition problem. If runner bean flowers fall without setting pods, review the basics first: has the soil dried out? Has there been a hot spell? Is the wigwam crowded and airless? Are plants excessively leafy from high nitrogen feeding? The answer is often in one of those places. French beans may perform better in dry periods, but both types benefit from steady care.
Keeping Pods Coming: The Routine That Makes a Wigwam Productive
The secret to a long bean season is not a secret at all. Pick often. Water deeply when dry. Keep an eye on plant health. It sounds almost insultingly straightforward, but these three habits make the difference between a brief glut and plants that continue cropping for months.
From sowing to first harvest usually takes around 12–16 weeks. Once the first pods appear, the rhythm changes. Walk past the wigwam every couple of days with a basket, not just when you have planned a grand harvesting session. Runner beans become tougher if allowed to grow too large, and French beans lose some of their tenderness if left to swell. More importantly, mature pods signal to the plant that it has done its reproductive job. Remove them, and it keeps trying.
Small garden growers
A wigwam gives you a generous climbing crop without needing a long row of supports or a large vegetable plot.
Kitchen gardeners
Grow runners for versatile large pods, or French beans for tender, frequent pickings close to the kitchen.
Ornamental growers
Flowering runners and colourful French bean pods earn their place in a decorative border as well as a veg bed.
It is worth harvesting with a little care. Support the stem with one hand and pick with the other rather than tugging hard at a pod. This avoids snapping stems or dislodging developing flowers nearby. It takes marginally longer, but the difference between a neat harvest and a handful of accidentally detached growth can be one impatient pull. Beans forgive a lot. They do not need us to make their job harder.
As summer advances, keep watering through dry periods and keep the centre of the wigwam accessible. Remove damaged leaves if they are clearly deteriorating, but do not strip plants unnecessarily. Healthy foliage is feeding the pods. Your aim is a vigorous, breathable structure that remains easy to inspect, rather than a perfectly manicured one.
GardenScout verdict
A bean wigwam is one of the most rewarding ways to grow vertically in a British garden. Build it strongly with six to eight long canes, plant only after soil has warmed, water deeply as flowering begins and pick relentlessly once pods arrive. Runner beans bring height, flowers and classic large pods; climbing French beans bring earlier, tender harvests and more pod colour. Give either one a secure framework and a little routine care, and a modest circle of soil can keep your kitchen supplied for much of the summer.