
The short answer
In December, protect first: drain and isolate outside taps, raise pots on feet and wrap them, and cover tender crowns with fleece or straw. Then plant bare-root trees, hedging and late garlic when soil is workable, start winter-pruning apples and pears from mid-December, lightly shorten tall roses, and leave plums and cherries alone.
When to do it
Now: November is a good time to plant bare-root trees.
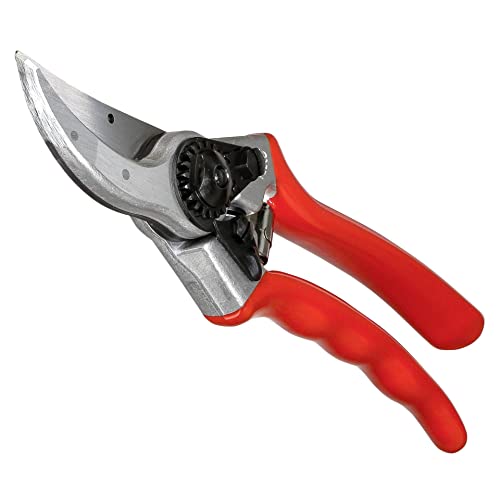
Useful for the December tidy of apple, pear and rose growth, especially when you want clean, controlled cuts. It is a durable choice for the pruning work this article recommends doing now.
Check price on Amazon
Helps tackle thicker or awkward branches during the apple and pear pruning section, where secateurs are not enough. The longer adjustable handles also make higher cuts easier to reach from the ground.
Check price on AmazonWe link to the exact model on Amazon UK. Prices change often, so check the live price before you buy. As an Amazon Associate we earn from qualifying purchases.
It is mid-November as I write this. The last of the leaves are coming down in soggy heaps, the clocks went back weeks ago, and the garden has the slightly sheepish look of a party venue the morning after. Most people are about to stop gardening for six weeks. I'd suggest doing something slightly different.
December is the one month when the garden asks very little of you and gives a lot back for the effort you do put in. A pruning cut made now heals into a better tree. A hedge planted now has the whole winter to root in before it has to support a single leaf. A greenhouse scrubbed now is a greenhouse you don't have to empty in March, when it is crammed with seedlings and you are trying to remember which tray is which.
Below is a week-by-week plan for the month. It's deliberately light. Nobody wants to spend the run-up to Christmas in waterproof trousers, and you don't need to. What you do need is to pick the right jobs and do them on the right days.
Before December even starts: there are three things worth doing in the next fortnight. Order any bare-root trees or hedging now, whilst nurseries still have the full range. Buy a roll of horticultural fleece and some pot feet so they are in the shed before the first hard frost rather than after it. And find out where the isolating valve for your outside tap is, so you aren't hunting for it by torchlight.
Why December Is the Gardener's Secret Weapon (Not a Write-Off)
The usual line on December is that it's a dead month. Nothing grows, nothing flowers apart from the odd hellebore and a mahonia doing its best, and everything is either frozen or waterlogged. All broadly true. It also misses the point.
I think of December as strategic downtime. Growth has slowed right down, so plants aren't competing with you for attention. There is no mowing, no deadheading, no daily watering of pots and no slug patrol. That frees up the time and headspace for the structural jobs that matter all year but are impossible to do properly in July: shaping fruit trees, planting hedges, sorting out the shed, thinking about where things should go.
Dormancy is the reason the timing works
Deciduous trees and shrubs aren't simply resting in winter. They've shed their leaves, stopped active growth and drawn their resources back into the woody framework and the roots. That changes what happens when you cut them.
Prune an apple tree in full leaf and you remove foliage it's actively using to feed itself, and you open wounds whilst the tree is busy with other things. Prune the same tree whilst it is dormant and you are working on a bare framework. You can see every branch, every crossing stem and every congested spur system. The tree responds the following spring by putting its energy into the buds you've left. Winter pruning tends to stimulate vigorous growth, which is exactly what you want on a tired or misshapen tree, and exactly why you should be restrained on a young one that is already growing well.
The same dormancy makes bare-root planting possible. A tree lifted from a nursery field in winter isn't trying to support leaves, so it copes with having its roots out of the ground for a short spell. Plant it now and the roots start to settle into the soil long before the buds break.
Short days, short bursts
The real constraint in December isn't the cold. It's the light. Around the winter solstice the useful working day can feel as though it ends just after lunch, and in the north of the country it is shorter still. The trick is to stop thinking in terms of a "gardening day" and plan in short, purposeful sessions instead: an hour on a Saturday morning to prune one tree, forty minutes on a dry afternoon to wrap the pots. Pick the job before you go out. Wandering about with secateurs and no plan is how December afternoons disappear.
Weather matters more than the calendar this month. The rule I use is simple: if the ground is frozen, or if soil sticks to your boots in clods, stay off the beds and do a shed, greenhouse or tool job instead. Every week in the plan below has a dry-weather job and a bad-weather job for exactly that reason.
The boot test
Before any planting or bed work, take a handful of soil and squeeze it. If it holds together in a shiny, sticky ball and leaves your palm smeared, it's too wet. Walking on it now will compact the structure you rely on in spring. If it crumbles apart, carry on. If it's frozen solid, put the spade away and clean the greenhouse instead.
The Month at a Glance: Your Four-Week Framework
The weeks below are a guide, not a timetable. If the first week of December turns out mild and dry and the third week is iron-hard frost, swap them round. What matters is the order of priorities: protect first, plant whilst the soil allows, prune once plants are fully dormant, and save the indoor jobs for the days when the weather shuts you out.
Week 1 (1–7 December): assessment and protection
Start with a walk round. Not a working walk, just a look. Which pots are still sitting on bare paving in a frost pocket? Is the outside tap exposed? Which tender plants are still out in the open because you meant to deal with them in October? Make a short list, then work through it. Protection goes first because a single hard frost can undo it all: a cracked pot, a split pipe or a rotted agapanthus crown can't be fixed after the event.
Week 2 (8–14 December): the planting window
With protection sorted, use any spell when the soil is unfrozen and workable to plant bare-root trees, shrubs, roses and hedging. If you didn't get your garlic in during autumn, there's still time. Garlic benefits from a period of cold to develop well-divided bulbs, so a December planting is perfectly respectable.
Week 3 (15–21 December): pruning opens
By mid-December, apples and pears are reliably dormant and the winter pruning season can begin. It runs on into the new year, so there is no need to tackle every tree in one week. Roses get a light tidy rather than their main prune. This is also the week to give secateurs and loppers a proper clean and sharpen, ideally before you start cutting.
Week 4 (22–31 December): the long pause
Christmas week is for the birds, quite literally. Keep feeders topped up and water ice-free. Beyond that, potter: oil the tools, sort the seed tin, start a planting list. If January brings a dry week, everything in the pruning and planting categories can roll over into it.
What can roll into January
Fruit tree pruning, bare-root planting, greenhouse cleaning and tool maintenance can all carry on into January without any penalty. What can't wait is protection. Taps, pots and tender crowns need to be dealt with before the first proper freeze, whenever that falls.
Week 1: Protect Before You Plant — Pots, Taps, and Tender Things
Protection isn't glamorous. Nobody has ever posted a photograph of their lagged outside tap with the caption "my proudest garden moment". But the first week of December is when I'd put the effort in, because everything on this list fails in the same way: quietly, overnight, and expensively.
Outside taps and pipes
The most reliable protection is to isolate and drain. Find the isolating valve inside the house, usually under the kitchen sink or where the pipe passes through the wall, turn it off, then open the outside tap to drain the remaining water. Leave it open. After that, fit foam pipe lagging over any exposed pipework and put an insulated cover over the tap itself. If your tap has no isolating valve, a plumber can fit one quickly, and it's one of the better small jobs you can have done to a house. Water expands as it freezes, and a split pipe on an outside wall often goes unnoticed until the thaw, when it starts pouring water into a wall cavity, shed or garage.
Hosepipes and water butts
Drain hoses fully, coil them and bring them into the shed or garage. A hose left full on the lawn will split in a hard frost, and a frozen hose reel is a miserable thing to wrestle with. Water butts can be left in use, since you'll want that rainwater in spring, but check the tap isn't dripping, as a slow leak becomes a hazardous ice patch on a path.
Terracotta and glazed pots
Pots crack because the compost inside gets saturated, the water freezes and expands, and the pot walls take the strain. Unglazed terracotta is porous, so it soaks up water itself, which makes it even more vulnerable. The fix is to deal with the wet first: raise pots on pot feet so they drain freely rather than sitting in a puddle, then wrap them in hessian or horticultural bubble wrap. Group pots together against a house wall, which is noticeably more sheltered than an open patio. Pots labelled "frost resistant" are more robust, but I still lift mine onto feet, because no label stops a waterlogged pot from freezing solid.
Tender and borderline-hardy plants
Anything that is only borderline hardy in your area needs its crown protected rather than its leaves. Dry straw, bracken or a thick mulch of leaves over the crown, held in place with fleece or a little chicken wire, insulates the growing point whilst still letting air move. Plants in pots, such as tender salvias, evergreen agapanthus and citrus, are best moved into a cold greenhouse, porch or unheated conservatory.
Specific plants worth a second look
Agapanthus. The deciduous types, which die down to bare crowns in autumn, are generally hardier than the broad-leaved evergreen types. In colder gardens, mulch the crowns of border plants with a dry mulch, and move evergreen ones in pots under cover.
Gunnera. The traditional and RHS-recommended method is lovely in its thrift: cut down the huge leaves once they've been blackened by frost and fold them over the crown like an upturned umbrella. Add a layer of straw underneath if your garden is cold.
Tree ferns. The growing point at the top of the trunk is the vulnerable bit. Pack the crown loosely with straw, then wrap the trunk and crown in a few layers of horticultural fleece. The trunk itself appreciates being kept from drying out, so on mild days it does no harm to check the fleece isn't sitting soaked against it.
Why not plastic? Clear plastic sheeting looks like the obvious waterproof answer, but it traps condensation against the plant, warms up in winter sun and cools sharply at night. Crowns sealed under plastic rot more often than they freeze. Use breathable materials, such as fleece, hessian and dry straw, and leave the plastic for the shed roof.
Fleece: the one bit of kit that earns a place
If you buy one thing for December, make it a roll of horticultural fleece. It's light, cheap, reusable for several winters if you dry it before folding, and it does everything from covering a tender shrub on a frosty night to lining a cold frame. I keep a pre-cut length near the back door so I can throw it over a vulnerable plant when a hard frost is forecast, without a trip to the shed in slippers. Thicker grades give more protection, and doubling a thinner one over works almost as well. Peg it down or weigh the edges with bricks, as fleece has a talent for ending up in next door's garden.
Do it on a dry day
Wrap pots and cover crowns when plants and compost are as dry as December allows. Wrapping a soaking-wet pot just locks the water in, and straw put over a sodden crown goes slimy rather than insulating. A dry, still afternoon in the first week is ideal.
Week 2: The Bare-Root Window — Trees, Hedging, and Garlic
Bare-root plants are lifted from nursery fields whilst dormant and sent out with their roots wrapped rather than in a pot of compost. The season runs roughly from November to March, and December sits nicely in the middle of it. Nurseries are fully stocked, the January rush for new-year planting projects hasn't yet thinned the choice, and the soil in most gardens still has some residual warmth from autumn compared with the depths of January.
Bare-root, container-grown or rootballed?
I'm a convert to bare-root for anything that is sold that way: fruit trees, hedging, roses, many ornamental trees and soft fruit bushes. It is almost always cheaper than the pot-grown equivalent, it's far easier to carry home and handle, and the root system has grown naturally in field soil rather than circling the inside of a pot. The trade-off is timing: you have to plant in the dormant season, and you have to plant promptly.
| Feature | Bare-root | Container-grown | Rootballed |
|---|---|---|---|
| Planting season | Dormant season only, roughly November to March | Any time the soil is workable, though autumn and winter are still best | Late autumn to early spring |
| Relative cost | Usually the cheapest way to buy trees and hedging | Usually the most expensive for the same plant | Between the two; mostly used for larger plants and evergreens |
| Root system | Natural spread, easy to inspect before planting | Can circle the pot if held too long | Field-grown roots held in a wrapped ball of soil |
| Handling and transport | Light and easy; roots must be kept moist | Heavy, bulky, but forgiving if planting is delayed | Heavy; the ball must stay intact |
| Range on offer | Wide in fruit trees, hedging and roses | Widest range overall | Mainly evergreen hedging, conifers and larger specimens |
| Best for | Hedges, orchards, roses, budget-conscious planting | Summer planting, specific cultivars only sold potted | Evergreen hedging such as yew, and instant height |
Planting a bare-root tree, step by step
Soak first
When the plants arrive, unwrap the roots and stand them in a bucket of water for an hour or two before planting. Don't leave them in there for days.
Dig wide, not deep
Make the hole wider than the spread of the roots but no deeper than they need. Look for the soil mark on the stem, the change of colour where it sat at ground level in the nursery, and plant so that mark is level with the surface again. Planting too deep is one of the commonest reasons young trees struggle.
Spread, backfill, firm
Spread the roots out naturally, then backfill with the soil you dug out, giving the tree a gentle shake as you go so soil settles between the roots. Firm with your heel. Current RHS advice is not to pile lots of compost into the planting hole, which can create a soft sump that holds water. Mulch the surface afterwards instead, keeping the mulch clear of the stem.
Stake low
A short stake, driven in before the roots go back in so you don't spear them, with a tie fairly low on the stem, lets the top of the tree flex in the wind. That movement builds a stronger trunk. Check ties each spring so they don't cut in as the stem thickens.
Can't plant straight away? If the ground is frozen or waterlogged when your order arrives, "heel in" the plants: dig a shallow trench in a spare patch of soil, lay the roots in at an angle and cover them. They'll sit happily for a few weeks. If the ground is frozen solid, keep them in a cool, frost-free shed with the roots wrapped and damp, and plant at the first opportunity.
Hedging whips
Bare-root hedging whips, young plants that are often little more than a single stem, are the most cost-effective way to plant a hedge, and native mixed hedging is one of the best things you can do for garden wildlife. Hawthorn (Crataegus monogyna), blackthorn (Prunus spinosa), field maple (Acer campestre), hornbeam (Carpinus betulus) and hazel all establish well from bare-root planting in the dormant season. Beech (Fagus sylvatica) is another classic, keeping its coppery dead leaves through winter when clipped as a hedge.
For a thick, stock-proof or wildlife hedge, plant in a double staggered row, two parallel lines with the plants in one row sitting opposite the gaps in the other. It costs more in plants than a single row, but the hedge thickens far faster at the base, which is where a single-row hedge tends to stay thin and gappy for years. Your supplier will advise on spacing for the species you choose. Many nurseries list it alongside each hedging plant.
The step most people skip: in the first spring after planting, cut whips of hawthorn, blackthorn and similar species back hard. It feels brutal, but it forces them to branch from low down, and a hedge that is dense at the bottom is the whole point of the exercise. That job is for spring, so put a note in your diary now.
Garlic, if it isn't in yet
Garlic is usually planted in autumn, but December planting in free-draining soil still works well. Split the bulb into individual cloves, plant them pointy end up so the tip is just below the surface, and space them so each clove has room to swell. On heavy clay that stays wet all winter, start cloves in modules in a cold frame and plant them out in late winter. Garlic sitting in cold, waterlogged soil tends to rot rather than root. Buy seed garlic from a garden supplier rather than planting supermarket bulbs, which may carry virus and are often varieties bred for warmer climates.
Water once, then leave it
Give newly planted trees and hedging a good soak to settle the soil round the roots, then leave the winter rain to it. The watering that matters comes next spring and summer. A new hedge that goes thirsty in its first dry May is the one that fails, not the one planted in December.
Week 3, Part 1: Apple and Pear Pruning — The Rules That Actually Matter
Fruit tree pruning has a reputation for being complicated, mostly because books like to show diagrams of perfectly balanced goblet shapes that bear no resemblance to the tree at the bottom of your garden. The good news is that the principles are few. Get them right and the details look after themselves.
The winter pruning season for free-standing apple and pear trees, meaning bushes, half-standards and standards, runs whilst the trees are dormant, from leaf fall until the buds begin to swell in late winter. I start mid-December, once leaves are fully off and growth has completely stopped. Avoid days of hard frost: frozen wood is brittle, cuts are less clean, and you'll risk damage to branches as you lean against or pull on them.
Plums, cherries, apricots and other stone fruit: do not prune now. Trees in the Prunus family are vulnerable to silver leaf and bacterial canker, which infect through pruning wounds in wet winter weather. The RHS advises pruning them in spring or summer when the tree is in active growth. Leave them alone in December, however untidy they look.
Know what kind of tree you have
Apples and pears flower and fruit on short, knobbly shoots called spurs, which develop on wood that is two years old or older. Most varieties are spur-bearers, which means the fruit is carried along the length of the branches. Familiar examples include 'Cox's Orange Pippin', 'Egremont Russet' and the pear 'Conference'. These are tolerant of having their branch tips shortened.
A smaller group are tip-bearers, or partial tip-bearers, which carry much of their fruit on buds at the ends of last year's shoots. 'Bramley's Seedling', 'Worcester Pearmain' and 'Irish Peach' are well-known examples. Shorten every shoot on these, the way you might on a spur-bearer, and you cut off next year's crop in a single afternoon. If you aren't sure which you have, look at the tips of last year's shoots: plump, rounded fruit buds at the very end suggest a tip-bearer.
1. The three Ds first
Remove anything dead, diseased or damaged, cutting back to healthy wood. Look out for canker, which shows as sunken, cracked patches on bark, often with a swollen rim. Cut well below the affected area and don't compost the prunings.
2. Crossing and crowded branches
Where two branches rub together, remove the weaker or worse-placed one. Take out branches growing back into the centre of the tree. You are aiming for an open framework that lets in light and air, which ripens fruit and helps keep fungal disease down.
3. Make clean cuts in the right place
Cut just above an outward-facing bud with a slight slope away from it, so water runs off. When removing a whole branch, cut just outside the collar, the slightly swollen ring where it joins the trunk or main limb, rather than flush with the trunk. The collar is what seals the wound. The RHS doesn't recommend wound paints on most pruning cuts.
4. Thin, don't scalp
On spur-bearers, older trees often develop congested spur systems that produce lots of small fruit. Thin these out, removing the oldest and most crowded parts. On tip-bearers, leave shoot tips alone and thin out whole crowded laterals instead, cutting some back to a bud near their base to encourage replacement shoots.
The mistake almost everyone makes once
Winter pruning stimulates growth. Take out a great deal of a tree's framework in one winter and it responds the next summer with a thicket of vertical, sappy water shoots that bear no fruit and leave you with more to prune than before. I did exactly this to an overgrown apple in my first garden and spent the next two years undoing it.
For a neglected tree, spread the renovation over two or three winters. Tackle the worst problems first, such as dead wood, a big crossing limb or an overcrowded centre, and leave the rest until next year. It is slower, but the tree stays calm and keeps cropping.
Trained trees are a different job
Cordons, espaliers, fans and stepovers are mainly pruned in summer, because summer pruning restricts growth and keeps those tidy shapes in check. In winter, limit yourself to thinning congested spurs and removing anything dead or damaged. If you have a trained tree, don't treat it like a free-standing bush now.
Stand back every few cuts
Pruning goes wrong when you get absorbed in one branch and forget the whole tree. After every handful of cuts, walk a few paces away and look at the overall shape. You can always take more off. You can't stick it back on.
Week 3, Part 2: Rose Pruning — Hard Cut or Light Tidy?
Ask three gardeners when to prune roses and you'll get four answers. Some swear by autumn, some won't touch them until the forsythia flowers, and one will tell you their grandmother did it on Boxing Day and the roses were magnificent. The current RHS position is fairly clear, though: the main prune for bush roses such as hybrid teas and floribundas happens in late winter, as growth is about to resume. In most of the UK that means February to early March, a little later in cold northern gardens.
That leaves December for a lighter job, which is worth doing.
Why bother in December at all?
The reason is wind rock. Tall hybrid teas and floribundas carrying a full summer's growth act like sails in winter gales. The stems are pushed back and forth, the base of the plant works loose, and a hole opens in the soil round the stem. Water collects there, freezes, and damages the base of the plant. On exposed sites it can loosen the root system enough to weaken the whole bush.
The fix is a modest reduction in height now: shorten the longest stems by a moderate amount, roughly a third, so the plant presents less to the wind, and leave the proper structural prune until late winter. Don't get carried away. The aim is ballast, not shape.
A light December tidy
- Reduces wind rock on tall bush roses in exposed gardens
- Lets you clear diseased leaves before they overwinter on the plant
- Makes the main late-winter prune quicker and easier to see
- Takes very little time on a dry day
A hard December prune
- Cut stems can die back further in frost, so you'll have to recut them in late winter anyway
- A mild spell can trigger soft new growth that is then caught by later frosts
- Removes the plant's buffer of extra buds against winter damage
- Gains you nothing over waiting for the proper late-winter prune
The December rose checklist
- Shorten tall stems on hybrid teas, floribundas and tall shrub roses to stop wind rock. Cut just above a bud with clean, sharp secateurs.
- Firm the base. After a gale, check the soil round each rose and firm it back with your heel where a gap has opened.
- Strip remaining leaves from bushes that suffered black spot this year. The fungus responsible, Diplocarpon rosae, overwinters on infected leaves and stems, both on the plant and on the ground, and its spores are splashed back onto new foliage in spring.
- Clear fallen leaves from under the roses and bin them, or send them off with the council green waste, rather than adding them to a cool garden compost heap that won't kill the spores.
- Tie in climbers and ramblers loosely, so long stems aren't whipping about in the wind. Their main pruning has its own timing: ramblers after flowering in summer, climbers in late winter.
- Plant bare-root roses now if you've ordered them. They're one of the best-value ways to buy roses, and December planting gives them plenty of time to root.
Clearing leaves won't cure black spot, but it helps
Leaf clearing reduces the amount of black spot carried over to next year. It won't eliminate it, because spores also survive on stems and blow in from neighbours' gardens. If black spot is a yearly battle, choosing more resistant varieties when you next plant will make more difference than any amount of raking.
What the Lawn Is Telling You (and Why You Should Listen)
The best December lawn care is mostly restraint. A lawn in winter is semi-dormant, the soil beneath it is often saturated, and nearly everything you might do to it does more harm than good. The lawn is not asking for attention. It's asking you to stay off it.
Don't walk on frosted grass
This is the one rule that applies all winter. When grass is frozen, the leaf blades are rigid with ice. Walk across them and the frozen cells are crushed and damaged. A day or two later you'll see a trail of brown or blackened footprints across the lawn, and they can stay visible for a surprisingly long time, until growth resumes and the damaged leaves are replaced. If you need to cross the lawn to reach the shed or the bird feeder, lay a temporary path of boards, or wait until the frost has lifted.
The same applies to waterlogged turf. Walking on soggy lawn compacts the soil and squeezes out the air that grass roots need, and the damage shows as thin, mossy patches next spring.
Mowing: the rare exception
As a rule, don't mow in December. Grass growth slows almost to a stop, the ground is usually too soft, and a mower on wet turf leaves ruts and tears. The exception is a mild autumn that has run on into early winter, with the grass still growing and looking shaggy. In that case, on a dry day with firm ground and no frost forecast, a single light trim with the mower set at its highest setting is fine. Take off the very tips, no more. If the grass is wet, or the mower leaves tracks, put it away.
Mild winters are becoming more common, so this exception comes up more often than it used to. It is still an exception.
No feeding
Autumn lawn feeds are low in nitrogen for a reason. Nitrogen encourages soft, lush leafy growth, and soft leafy growth in winter is easily damaged by frost and invites fungal diseases such as fusarium patch, which thrives in cool, damp conditions. Save feeding for spring, once the grass is growing actively again.
Worth doing in December
- Clear fallen leaves from the lawn on a dry day, as a leaf blanket blocks light and encourages disease
- Brush off worm casts once they are dry, so they don't get smeared into the surface
- Keep off it when frosted or waterlogged
- Get the mower serviced and the blade sharpened before the spring rush
Leave until spring
- Feeding of any kind
- Scarifying and moss treatments, which need the grass to be growing so it can recover
- Laying new turf on wet or frozen ground
- Regular mowing
Leaves into leafmould. The leaves you rake off the lawn, as long as they aren't the black-spotted rose leaves from earlier, are perfect for leafmould. Pack them damp into a bin bag, punch a few holes in it, and leave it in a corner. Leafmould is slow but produces a lovely, crumbly soil improver or mulch.
The Greenhouse in December: Clean Now, Grow Better in Spring
I'll admit that greenhouse cleaning is the December job I put off longest. It's cold, wet and fiddly. It's also the job I'm most grateful for when I start sowing, because December is the only month when the greenhouse is almost empty. By January the first chillies and sweet peas are in, and by February the staging is full. Clean it now and you're starting the new season in a clean, bright house. Leave it, and you're shuffling seed trays about whilst scrubbing round them.
Why it matters
Two reasons, light and hygiene. In winter, daylight is in short supply, and a film of algae, grime and old shading paint on the glass robs young plants of what little there is. Seedlings grown in poor light stretch and become leggy. Hygiene matters too: greenhouse pests, including whitefly, red spider mite and aphids, along with fungal spores, overwinter in the cracks and crevices of glazing bars, staging and old pots. A thorough clean takes away much of that carry-over.
How to do it
Pick a mild, dry day
Any overwintering plants will need to come out whilst you work. Choose a day without frost, stand them somewhere sheltered and throw fleece over anything tender. If you have a lot of plants, work in sections, emptying one end of the greenhouse at a time.
Clear everything out
Remove pots, trays, labels, old compost and plant debris. Sweep the floor and staging. Old compost and fallen leaves are exactly where pests and diseases hide.
Wash the glass inside and out
Warm water with a little washing-up liquid and a soft brush or sponge on a long handle does most of the work. Rinse thoroughly. For stubborn grime in the overlaps between panes, slide a plastic plant label into the gap to scrape out the muck, then flush through.
Disinfect the structure
Glazing bars, staging, shelves and the frame are where pests overwinter. Scrub them with a garden disinfectant made up exactly at the dilution on the label, paying attention to joints and corners. Wear gloves, keep it off plants, and ventilate well whilst it dries.
Wash pots and trays
Wash and dry pots, trays and modules now, whilst you are in cleaning mode, and stack them ready for spring. I do mine in a bucket outside the greenhouse door, which is not a pleasant job in December but beats doing it in March.
Keeping it working through winter
Once clean, keep the greenhouse ventilated on mild, sunny days. Opening a vent or the door for a few hours lets damp air out, and damp still air is what encourages grey mould (Botrytis) on overwintering plants. Close up again well before dusk to keep in what warmth there is.
Water overwintering plants sparingly, in the morning, and only when they need it. Most plants sitting in a cold greenhouse in December want far less water than you'd think, and cold, wet compost causes more losses than cold alone. Pick off dead or mouldy leaves as soon as you see them.
If you overwinter tender plants, horticultural bubble wrap fixed to the inside of the frame is an effective insulation layer. Choose a horticultural type, which is made to let more light through and last longer under sunlight. If you have a heater, check it now, not on the first night of a cold snap. Paraffin heaters need a clean wick and good ventilation. Electric heaters must be on a suitable outdoor-rated circuit with an RCD.
No greenhouse? Same principle
Cold frames, porches and windowsills used for overwintering benefit from the same clean-and-check routine. Wiping a cold frame lid takes five minutes and lets in more light. Check pots on windowsills for vine weevil grubs and fungus gnats whilst you're at it.
Week 4: Birds, Tools and the Long Pause
Christmas week is when I like to keep the garden jobs small and pleasant. The two things that truly matter this week are birds and tools: one needs attention daily, the other once, properly.
Feeding birds through the cold
Winter is hard for garden birds. Natural food runs low, days are short, and small birds have to eat enough during daylight to survive a long, cold night. The RSPB recommends feeding year-round, but winter is when your feeders make the most difference. Consistency matters: birds come to rely on a reliable source, so once you start, keep the feeders topped up, especially in cold spells.
What to put out
High-energy foods are best in winter: sunflower hearts, good-quality seed mixes, nyjer seed for goldfinches, suet and fat balls. If you buy fat balls in mesh bags, take them out of the mesh and put them in a proper feeder, as birds can catch feet and tongues in the netting. Fruit such as apples and pears, cut into pieces, is popular with blackbirds and thrushes, especially when scattered on the ground.
What not to put out
The RSPB advises against salty food and against fat from roasting tins, including Christmas turkey fat, which sets soft, can smear onto feathers, and is mixed with meat juices that spoil quickly. Don't put out dry, hard food such as unsoaked bread or dried coconut, which can swell in a bird's stomach. Christmas leftovers aren't a free pass for the bird table.
Water matters as much as food
Birds need water for drinking and for keeping feathers in good condition, and in freezing weather it can be harder to find than food. Break the ice on bird baths each morning, or pour on warm water to melt it. Never add salt, antifreeze or any chemical to stop it freezing. A ping-pong ball floating on the surface can help slow ice forming in light frosts.
Keep it clean
Feeders and bird tables can spread diseases such as trichomonosis, which affects greenfinches and other finches. Clean feeders regularly with a mild disinfectant, rinse them well, and move them occasionally so droppings don't build up underneath. Wear gloves and wash your hands afterwards.
Looking ahead to spring: peanuts are a good winter food, but they should always go in a mesh feeder, not loose. Come the breeding season, the RSPB warns that whole peanuts and other large, hard items can choke chicks if adults bring them back to the nest. That is a job for March, not now, but it is worth knowing before you buy a giant sack in the January sales.
Cleaning and sharpening tools
Clean, sharp tools make every job quicker, and in pruning season they make a measurable difference to the plant: a sharp blade cuts cleanly, a blunt one crushes and tears, and torn tissue heals slowly and lets disease in. If you only maintain one tool this winter, make it your secateurs.
- Clean off the dirt. Scrape soil off spades, forks and hoes, then wash and dry them. Wire-brush any rust.
- Clean the blades. Sap builds up on secateurs and loppers. Wire wool or a scourer takes it off, and wiping blades with a household disinfectant afterwards reduces the chance of spreading disease, particularly after you've been cutting out canker or diseased wood.
- Sharpen. A small diamond file or whetstone, drawn along the bevelled edge of the cutting blade only, restores a good edge. Follow the existing angle and don't touch the flat side or the anvil. Spades and hoes benefit from a quick sharpen with a file too.
- Oil. A light oil on blades and pivots stops rust and keeps the action smooth. Wooden handles appreciate a rub with linseed oil.
- Book the mower in. Winter is the quiet time for mower servicing. Book in December or January and it'll be ready long before the first cut of spring.
The seed tin and the notebook
On the darkest afternoons, sort through your seed packets, throw out the very old ones and make a list of gaps. Then make a few notes on what worked this year and what didn't. In my experience, the gardener who plans in December has a much calmer spring than the one who starts in March with a full basket and no idea where any of it is going.
Kit that makes this easier
A few tools that help with the jobs above. We link to the exact model on Amazon UK.
FELCO Secateurs
Useful for the December tidy of apple, pear and rose growth, especially when you want clean, controlled cuts. It is a durable choice for the pruning work this article recommends doing now.

Check today's price: FELCO Secateurs on Amazon UK
Wolf Garten RS900T Power Cut Telescopic
Helps tackle thicker or awkward branches during the apple and pear pruning section, where secateurs are not enough. The longer adjustable handles also make higher cuts easier to reach from the ground.

Check today's price: Wolf Garten RS900T Power Cut Telescopic on Amazon UK
What to Leave Alone, What Can Wait, and Common Questions
A December checklist is as much about what not to do as what to do. Here are the main jobs to resist, along with the jobs you can happily put off until the new year.
Leave alone in December
- Frozen or waterlogged lawns. Stay off them.
- Wet, sticky soil. Don't dig, plant or walk on beds when the soil smears. Wait for a drier spell, even if it means waiting until January.
- Plum, cherry and other stone fruit trees. Prune these in spring or summer, never in winter.
- Spring-flowering shrubs such as forsythia, flowering currant and early-flowering clematis. Pruning now removes this spring's flowers. Their pruning comes after they flower.
- Perennials left standing. Seed heads and hollow stems shelter overwintering insects and feed birds. There is no rush to cut back border perennials. Late winter does nicely.
- Hedges with nesting potential. Not a December issue, but bear it in mind when planning hedge work: the bird nesting season starts in spring, so any hard cutting of established hedges is better done during winter or after nesting.
Happy to wait until January
- Winter pruning of apples and pears, which runs well into the new year
- Bare-root planting, provided you can heel in or store plants properly in the meantime
- Greenhouse cleaning, though aim to finish it before sowing begins
- Pruning of wisteria's long whippy shoots, a classic late winter job
- Main rose pruning, which belongs in late winter anyway
Frequently asked questions
The December plan in a nutshell
Protect before the first hard frost: isolate and drain outside taps, raise and wrap pots, and cover tender crowns with breathable materials. Plant bare-root trees, roses and hedging whenever the soil is workable, and get any remaining garlic in. Start winter pruning of free-standing apples and pears once they are fully dormant, keeping it moderate and leaving tip-bearers' shoot tips alone. Give roses a light trim against wind rock and clear away black-spotted leaves.
Then stay off frosted lawns and wet beds, leave stone fruit unpruned, keep the birds fed and watered, and use the wet days for the greenhouse and the tool kit. Anything you don't finish rolls happily into January. It's the quietest month in the garden, but a little effort now pays back all year.
- FELCO SecateursBest for regular pruningView on Amazon
- Wolf Garten RS900T Power Cut TelescopicFor thicker branchesView on Amazon
Buying for a gardener? See our gifts for gardeners, checked on Amazon every day.